
Deploying robotic code as a single package across dev boards

elopio
on 11 July 2017
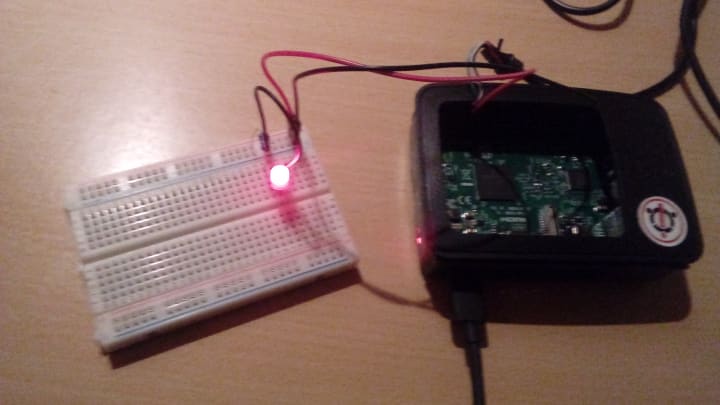
I love playing with my prototyping boards. Here at Ubuntu, we are designing the core operating system to support every single-board computer and keep it safe, updated and simple. I've learned a lot about physical computing, but I always have a big problem when my prototype is done and I want to deploy it. I am working with a Raspberry Pi, a DragonBoard, and a BeagleBone. They are all very different, with different architectures, different pins, onboard capabilities and peripherals, and they can have different operating systems. When I started learning about this, I had to write 3 programs that were very different, if I wanted to try my prototype in all my boards.

Then I found Gobot, a framework for robotics and IoT that supports my three boards, and many more. One major benefit is that you can write all the software in the lovely and clean Go language. The Ubuntu store supports all their architectures too, and packaging Go projects with snapcraft is super simple. So we can combine all of this to make a single snap package that with the help of Gobot will work on every board, and deploy it to all the users of these boards through the snaps store. Let's dig into the code with a very simple example to blink an LED, first for the Raspberry PI only.
package main
import (
 "time"
 "gobot.io/x/gobot"
 "gobot.io/x/gobot/drivers/gpio"
 "gobot.io/x/gobot/platforms/raspi"
)
func main() {
 adaptor := raspi.NewAdaptor()
 led := gpio.NewLedDriver(adaptor, "7")
 work := func() {
   gobot.Every(1*time.Second, func() {
     led.Toggle()
   })
 }
 ro[bot := gobot.NewRobot("snapbot",
   []gobot.Connection{adaptor},
   []gobot.Device{led},
   work,
 )
 robot.Start()
}
In there you will see some of the Gobot concepts. There's an adaptor for the board, a driver for the specific device (in this case the LED), and a robot to control everything. In this program, there are only two things specific to the Raspberry Pi: the adaptor and the name of the GPIO pin ("7").
package main
import (
 "log"
 "os/exec"
 "strings"
 "time"
 "gobot.io/x/gobot"
 "gobot.io/x/gobot/drivers/gpio"
 "gobot.io/x/gobot/platforms/beaglebone"
 "gobot.io/x/gobot/platforms/dragonboard"
 "gobot.io/x/gobot/platforms/raspi"
)
func main() {
 out, err := exec.Command("uname", "-r").Output()
 if err != nil {
   log.Fatal(err)
 }
 var adaptor gobot.Adaptor
 var pin string
 kernelRelease := string(out)
 if strings.Contains(kernelRelease, "raspi2") {
   adaptor = raspi.NewAdaptor()
   pin = "7"
 } else if strings.Contains(kernelRelease, "snapdragon") {
   adaptor = dragonboard.NewAdaptor()
   pin = "GPIO_A"
 } else {
   adaptor = beaglebone.NewAdaptor()
   pin = "P8_7"
 }
 digitalWriter, ok := adaptor.(gpio.DigitalWriter)
 if !ok {
   log.Fatal("Invalid adaptor")
 }
 led := gpio.NewLedDriver(digitalWriter, pin)
 work := func() {
   gobot.Every(1*time.Second, func() {
   led.Toggle()
   })
 }
 robot := gobot.NewRobot("snapbot",
   []gobot.Connection{adaptor},
   []gobot.Device{led},
   work,
 )
 robot.Start()
}
We are basically adding in there a block to select the right adaptor and pin, depending on which board the code is running. Now we can compile this program, throw the binary in the board, and give it a try.

But we can do better. If we package this in a snap, anybody with one of the boards and an operating system that supports snaps can easily install it. We also open the door to continuous delivery and crowd testing. And as I said before, super simple, just put this in the snapcraft.yaml file:
name: gobot-blink-elopio
version: master
summary: Blink snap for the Raspberry Pi with Gobot
description: |
 This is a simple example to blink an LED in the Raspberry Pi
 using the Gobot framework.
confinement: devmode
apps:
 gobot-blink-elopio:
 command: gobot-blink

parts:
 gobot-blink:
 source: .
 plugin: go
 go-importpath: github.com/elopio/gobot-blink
To build the snap, here is a cool trick thanks to the work that kalikiana recently added to snapcraft. I'm writing this code in my development machine, which is amd64. But the raspberry pi and beaglebone are armhf, and the dragonboard is arm64; so I need to cross-compile the code to get binaries for all the architectures:
$ snapcraft --target-arch=armhf
$ sncapcraft clean
$ snapcraft --target-arch=arm64
That will leave two .snap files in my working directory that then I can upload to the store with snapcraft push. Or I can just push the code to GitHub and let build.snapcraft.io to take care of building and pushing for me. Here is the source code for this simple example: https://github.com/elopio/gobot-blink
Of course, Gobot supports many more devices that will let you build complex robots. Just take a look at the documentation in the Gobot site, and at the guide about deployable packages with Gobot and snapcraft.

$ sudo snap install gobot-blink-elopio --edge --devmode
$ sudo gobot-blink-elopio
Now my experiments will be to try make the snap more secure, with strict confinement. If you have any questions or want to help, we have a topic in the forum.
Ubuntu desktop
Learn how the Ubuntu desktop operating system powers millions of PCs and laptops around the world.
Newsletter signup
Related posts
Let’s talk open design
Why aren’t there more design contributions in open source? Help us find out!
DISA publishes STIG for Ubuntu 22.04 LTS
Introduction DISA, the Defense Information Systems Agency, has published their Security Technical Implementation Guide (STIG) for Ubuntu 22.04 LTS. The STIG...
What is MLflow?
MLflow is an open source platform, used for managing machine learning workflows. It was launched back in 2018 and has grown in popularity ever since, reaching...