
Getting started with Ubuntu Core – streaming video from a Raspberry Pi

Galem KAYO
on 23 July 2019
Tags: Internet of things , Raspberry Pi , Snaps , Ubuntu Core
Artificial intelligence relies on machine vision just as much as human intelligence relies on vision. Image sensors are, therefore, crucial for AI applications because of the richness of data that they capture. Capturing and processing video and images at the edge is a capability that intelligent IoT applications need to deliver. In this tutorial we will build the first block of such intelligent applications by implementing a connected camera capable of streaming video to remote network clients for further processing.
Introduction
For this purpose, we use an off-the-shelf Raspberry Pi running on Ubuntu Core, with a snapped version of picamera deployed as a snap. The snap version of picamera was developed by @ogra and is available in the Snap Store, for all Raspberry Pi owners to use freely.
We will go through the following main steps in this tutorial:
- Installing Ubuntu Core on the Raspberry Pi
- Booting Ubuntu Core and setting up the board
- Installing the snap package and launching the video streaming application
Prerequisites
The bill of materials necessary for this tutorial is detailed in the table below. These are items that most Raspberry Pi owners will have or can easily order at a relatively modest price online.
| Hardware | Qty | Remarks |
| Raspberry Pi | 1 | Model 2 or 3 |
| Raspberry Pi camera module | 1 | CSI interface |
| USB TTL serial cable / HDMI cable | 1 | HDMI to connect to a display |
| Micro-SD card | 1 | 1GB or more |
| SD card reader | 1 | On development PC, or in a USB adapter |
| WiFi dongle | 1 | USB interface |
This tutorial was made on Ubuntu, however the actions described below remain broadly applicable for IoS and Windows.
Install Ubuntu Core on your Raspberry Pi
Step 1: Create an Ubuntu SSO account.
Step 2: Generate an rsa key to import to your Ubuntu SSO account
To keep things simple, create keys in the home directory of the development PC:
ssh-keygen -t rsaThen name your keys and enter a passphrase for them. The public key will be used to SSH remotely into the Raspberry Pi once Ubuntu Core has been installed. To attach the generated keys to your board, it will be necessary to import your public key into your Ubuntu SSO account (simple copy and paste).
Step 3: Download Ubuntu Core for your Raspberry Pi 2 or Raspberry Pi 3
Step 4: Create a bootable image of Ubuntu Core on your SD card
More details regarding bootable disks can be found here. In the setup used for this tutorial, the image was saved in the Downloads folder of Ubuntu desktop, and the SD card’s file was /dev/sdb.
xzcat ~/Downloads/ubuntu-core-18-armhf+raspi3.img.xz | sudo dd of=/dev/sdb bs=32MBoot Ubuntu Core and setup your Raspberry Pi
Step 5: Connect the serial cable to your PC and Raspberry Pi
Using a serial cable makes it possible to perform all subsequent operations on the development PC, rather than connecting the board via HDMI to another display while accessing it from the development PC. It is therefore less tedious (and recommended) to use a USB serial cable as described below for the next phases. The image below shows the general setup of the cable.
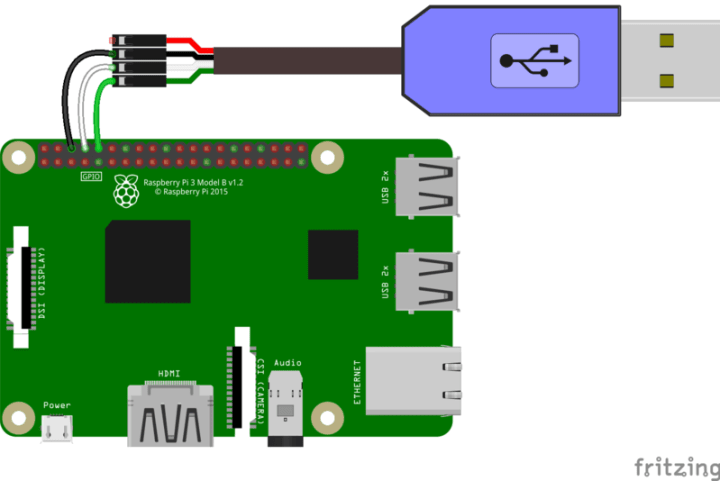
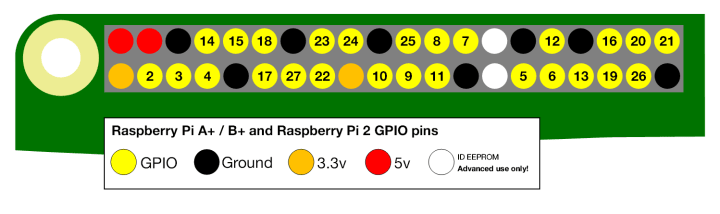
Care should be taken to match the serial cables with the GPIO PINs appropriately as described below:
| GPIO PIN | Serial Cable |
| Ground | Ground |
| Pin 14 (UART Tx) | Rx |
| Pin 15 (UART Rx) | Tx |
Once the serial is connected to the board GPIO PINs and to a USB port on the development PC, start a session as follows, using GNU Screen, to access the serial console. This will allow you to monitor the boot and configure the board.
sudo screen /dev/ttyUSB0 115200Step 6: Boot your Raspberry Pi
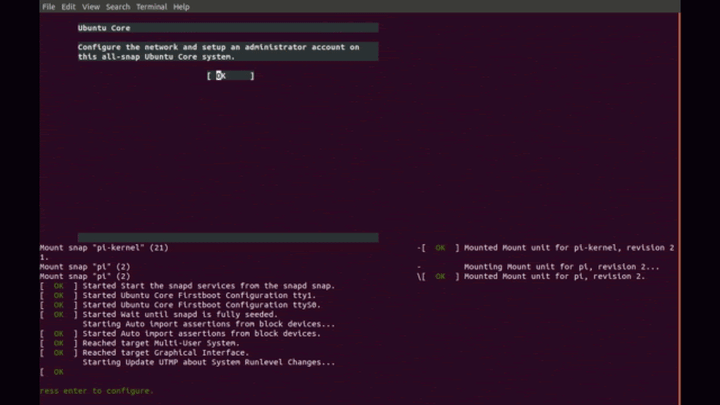
For this step, insert the SD card into the intended slot in the board and power it up. You should see the board booting up as depicted below.

Step 7: Setup WiFi same as your PC
Once the first boot has completed, you will be asked to configure the board. Enter you WiFi access credentials here. The board will connect to the internet to retrieve the public key that was generated in the earlier steps, so as to allow SSH connections to the board from your development PC.
Step 8: SSH into your Raspberry Pi using the board’s IP address
Once the board setup has completed, Ubuntu Core will display the network IP address of the board. You can then use your key and your Ubuntu SSO ID to access your board from your development PC. You will be asked to authenticate your board and to enter a passphrase for your key. These actions will log you into your Raspberry Pi running Ubuntu Core. Welcome!
ssh -i <your key> <your sso id>@<board IP address>
Install your video streaming application
Step 9: Enable the camera on your board
It will be necessary to edit the uboot config file on your board to enable the camera. A simple text editor like vi or nano should be used to this end.
sudo vi /boot/uboot/config.txtOnce the file is opened, scroll down to the last line and then type the following commands:
| a | insertion mode, append after the cursor |
| start_x=1 | add this line to enable the camera |
| ESC | leave insertion mode |
| : x | exit and save |
Step 10: Install the picamera demo application
Snaps show part of their magic in this step. In a single command, you will be able to download and install a ready to use, and properly configured application package developed by the community. Performing such a setup manually (with debs or cloning the code from github) would take much more configuration time. Snaps give you the flexibility to install, test or remove applications in a simple and clean way. This capability accelerates embedded product development quite significantly.
snap install picamera-streaming-demo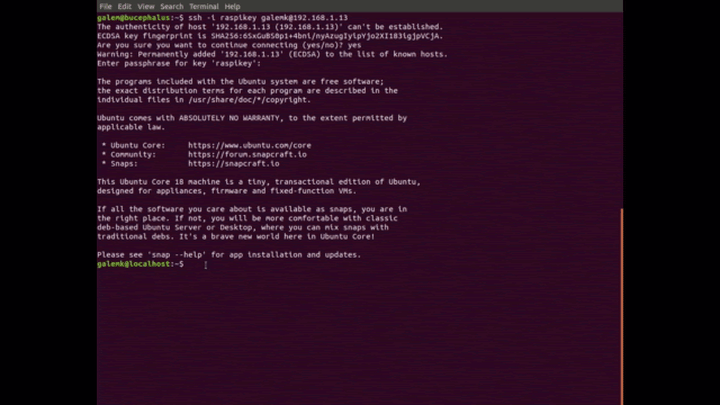
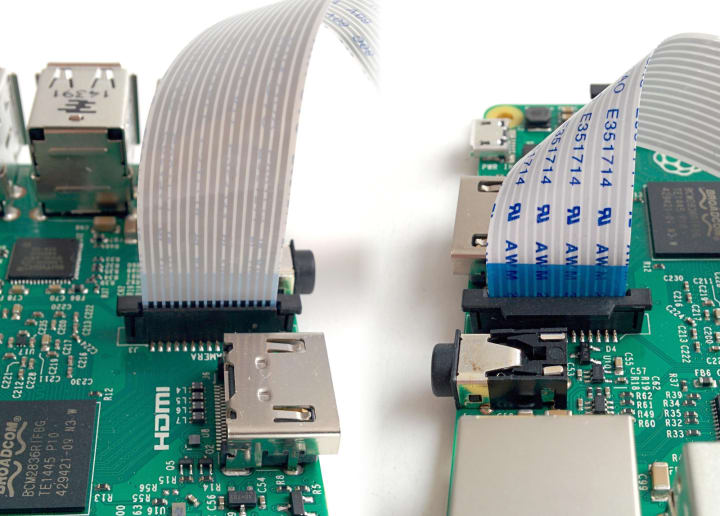
Step 11: Connect the camera to the CSI interface
Take care to connect the camera wires as depicted below.
Step 12: Reboot the Raspberry Pi
Step 13: Watch the stream in your browser
http://<board IP address>:8000/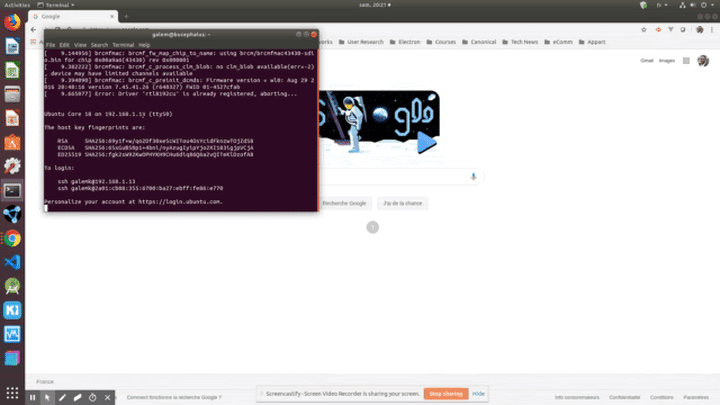
Takeaways
- Snaps save several long and tedious steps
- Snaps accelerate device prototyping
- Snaps are easy to install, test, remove
- Snaps are application containers optimised for embedded systems
Resources
- Picamera-streaming-demo on snapcraft.io
- Picamera-streaming-demo snap source on GitHub
- How to manage snaps on a device
Next steps
Following this demo, we will demonstrate in upcoming posts how to develop custom image recognition applications on the Raspberry Pi, leveraging artificial intelligence. Based on these first blocks we will create additional demos to illustrate machine vision and AI use cases at the edge with Ubuntu Core.
Ubuntu Desktop for Raspberry Pi
Watch the live event of the 20.10 launch the and find out all the news about the new Ubuntu Desktop image for Raspberry Pi.
Newsletter signup
Related posts
Canonical’s Ubuntu Core receives Microsoft Azure IoT Edge Tier 1 supported platform status
London, 20 March 2024. Canonical has announced that Ubuntu Core, its operating system optimised for the Internet of Things (IoT) and edge, has received...
Create an Ubuntu Core image with Landscape Client included
Canonical recently released the Landscape Client snap which, along with the new snap management features in the Landscape web portal, allows for device...
Simplify IoT device management: How to add Ubuntu Core devices to Landscape
Landscape has been a member of the Canonical product list for almost as long as Canonical has existed. Landscape allows administrators to manage their desktop...